
By Sunhorizon Editorial Team / Date: August 13, 2026
Table of Contents
- Why Does an Audio Volume Knob Make Scratchy Noise?
- Match Resistance Before Buying
- Audio Taper Matters More Than Many Users Expect
- 6 mm Shaft and Panel Fit
- Should You Choose a Rotary Control With a Switch?
- Comparison of Common Replacement Options
- Soldering and Installation Considerations
- A Practical Selection Checklist
- What Is the Most Reasonable Choice?
- Conclusion
- Sources
Why Does an Audio Volume Knob Make Scratchy Noise?
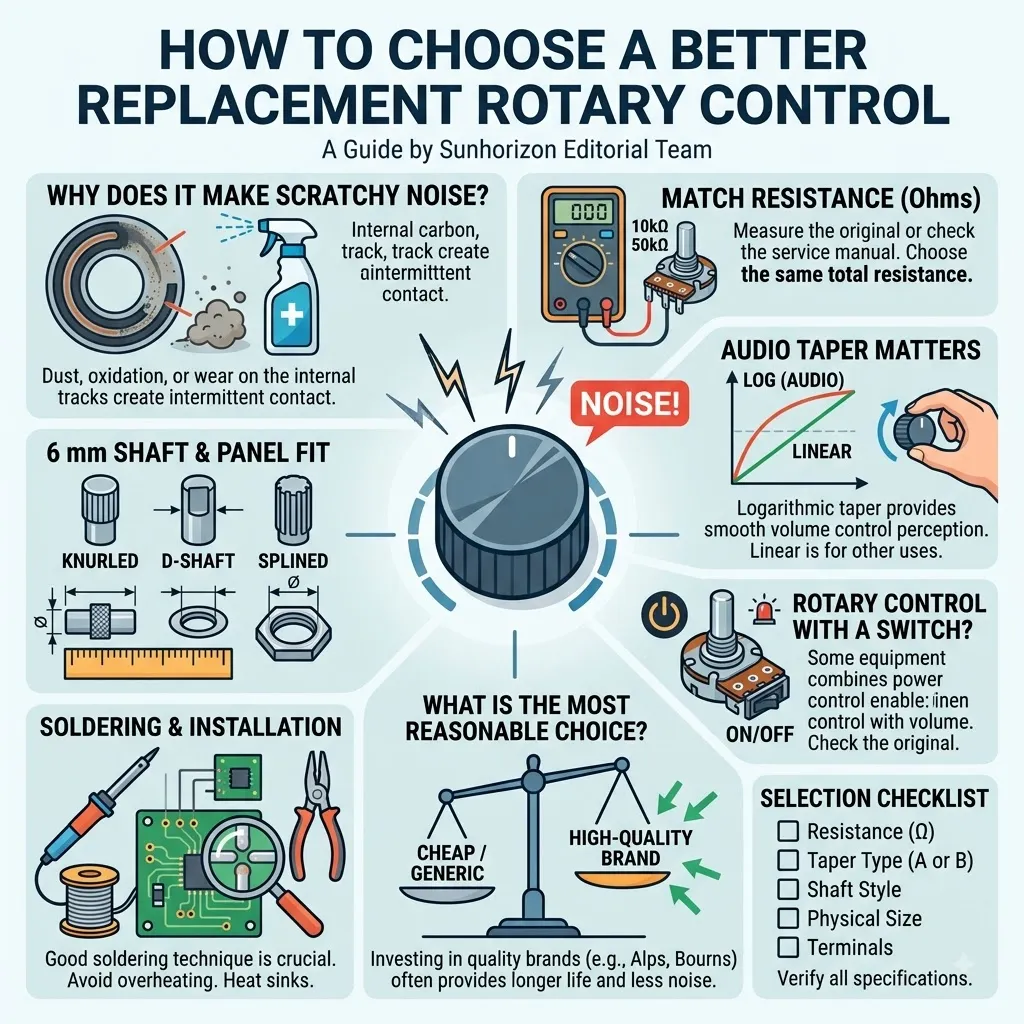
A scratchy sound when turning an audio volume knob is a common sign of wear in the control itself. The noise may come from wear on the carbon track, contamination, oxidation, or poor contact between the wiper and resistive element.
However, noise does not always mean that the variable resistor has completely failed. A worn or dirty control may still change volume, but the signal can become unstable during adjustment.
In audio equipment, the control also affects user experience. A smooth rotation should produce a predictable change in volume. If the sound jumps, cuts out, or becomes noisy at certain positions, replacement may be more practical than continued use.
Bourns lists carbon, conductive plastic, and cermet as common element materials for panel controls. Its product range also shows that audio applications can require different electrical and mechanical configurations.
Match Resistance Before Buying
The first specification to check is resistance.
If the original part is marked 50K, for example, replacing it with another 50K unit is usually the logical starting point. But resistance alone does not guarantee compatibility.
The replacement should also match:
- Total resistance
- Taper
- Number of sections
- Shaft diameter
- Shaft length
- Mounting method
- Terminal layout
- Rotation angle
- Switch configuration, if required
A 50K audio control and a 50K linear variable resistor may have the same nominal resistance but behave very differently in an amplifier.
For stereo equipment, a dual-gang design may also be required. One section controls the left channel while the other controls the right channel.
Audio Taper Matters More Than Many Users Expect
Volume controls usually need a response that feels natural to the human ear. This is why audio-taper controls are common in audio equipment.
A linear control changes resistance in a roughly proportional manner as the shaft rotates. An audio-taper design uses a different resistance curve, so the perceived volume change can feel more natural.
Bourns provides both linear and audio taper options across its panel-control families.
This means that simply matching the resistance value is not enough.
Example:
If the original part is marked B50K, do not automatically assume every 50K replacement will provide the same result. Check the manufacturer’s coding system and datasheet before ordering.
6 mm Shaft and Panel Fit
A stated “6 mm mounting hole” can refer to different dimensions, so measurement matters.
The shaft diameter, bushing diameter, panel hole, shaft length, and mounting thread should all be checked separately.
For example, Bourns’ PTR90 series uses a 6.0 mm shaft diameter and a 9 mm-class body. The series also supports audio taper, multiple sections, and a rotary switch.
This makes the series a useful reference when evaluating the mechanical requirements of a compact audio replacement. It does not, however, mean that every PTR90 configuration will fit every amplifier.
The PCB footprint is equally important. A control with the correct shaft may still fail to fit if its pins are positioned differently.
Should You Choose a Rotary Control With a Switch?
A built-in switch can be useful when the original audio equipment uses the volume knob for both volume adjustment and power control.
The switch is normally operated at one end of the rotation. But the exact electrical configuration varies by model.
The Bourns PTR90, for example, combines the adjustment element with a rotary switch and specifies a maximum switch contact resistance of 50 milliohms and a rated switch load of 3 A at 16 VDC.
This specification should not be treated as a universal rating. The switch must match the circuit and the original component.
If the original amplifier has a separate power switch, adding a switched control may add unnecessary wiring and complexity.
Comparison of Common Replacement Options
| Replacement type | Main advantage | Main limitation | Suitable use |
|---|---|---|---|
| Single-gang carbon control | Simple and economical | Not suitable for stereo channels | Mono audio |
| Dual-gang audio control | Controls two channels together | More pins and dimensions to match | Stereo amplifiers |
| Control with rotary switch | Combines volume and power control | Requires switch-compatible wiring | Older audio equipment |
| Conductive-plastic control | Can offer good durability | Often costs more | Higher-end equipment |
| Cermet control | Good stability in many applications | Not always ideal for traditional audio use | Instrumentation and control |
| Sealed carbon control | Better protection from dust | May cost more than basic open designs | Consumer electronics |
Bourns’ current panel-control portfolio shows that element material, shaft style, terminal type, sealing, taper, resistance range, and switch options can all vary by series.
Therefore, there is no single “best” replacement for every amplifier.
Soldering and Installation Considerations
For a replacement intended for straightforward installation, through-hole terminals are often easier to work with than unusual mounting arrangements.
Before ordering, compare the original PCB footprint with the replacement drawing. Pin spacing is just as important as the shaft size.
The PTR90 datasheet provides recommended PCB layouts and manual soldering specifications, which shows why the manufacturer’s mechanical drawing should be checked before installation.
For a mains-powered amplifier, unplug the equipment before any service work. Large capacitors can retain electrical energy even after power is removed. If the equipment involves mains voltage or you are not experienced with electronics repair, use a qualified technician or have an experienced adult handle the work.
A Practical Selection Checklist
For the described audio repair case, the following order is more reliable than choosing by appearance:
1. Read the original marking.
Look for the resistance value, taper code, and other manufacturer markings.
2. Count the terminals.
Three terminals usually indicate one adjustment section. More terminals may indicate a dual-gang unit or an integrated switch.
3. Measure the shaft.
Check the actual shaft diameter, shaft length, and shape.
4. Measure the panel opening.
Do not rely only on an approximate 6 mm measurement.
5. Compare the PCB footprint.
Pin position and mounting points must match.
6. Check the rotation feel.
Running torque and detents can change the user experience.
7. Check the electrical rating.
Resistance, taper, power rating, and switch rating should match the application.
8. Check the expected life.
A longer rated rotational life may be useful for equipment that receives frequent adjustment.
Bourns, for example, lists a 15,000-cycle rotational-life rating for its PRS11R commercial panel-control series, while other product families have different life specifications.
What Is the Most Reasonable Choice?
For a worn audio volume control, the most balanced replacement is usually not the most expensive part. It is the part that matches the original electrical and mechanical specifications while offering suitable durability.
For a stereo amplifier, a dual-gang audio-taper carbon-track control may be appropriate when the original design uses two channels. If the original unit also switches power, a rotary resistor with an integrated switch can reduce the need for a separate control.
For a simple repair, through-hole terminals and a familiar PCB footprint can also make installation easier.
The key point is simple: match the complete specification, not just the resistance value or shaft diameter.
Conclusion
A scratchy audio volume knob can be caused by wear, contamination, or contact problems. Replacing the control can restore smooth adjustment, but selecting the correct part requires more than choosing a similar-looking component.
Resistance, taper, gang configuration, shaft size, mounting dimensions, terminal layout, switch function, and rated life all matter.
For buyers comparing replacement parts, manufacturer datasheets provide a more reliable basis than product photos alone. The Bourns PTR90 documentation is one example of how detailed electrical and mechanical specifications can be used to evaluate a compact audio control.
For additional information about rotary controls and electronic component selection, visit the Sunhorizon potentiometer product information page.
Sources
- https://www.instagram.com/reel/Db5Qwk5O9FU/
- https://www.facebook.com/reel/957365730706737